In honor of the release of the new Adobe Photoshop Elements 9 software, Twittermoms are asking us to share tips for editing and creating beautiful digital photo projects.
This is something right up my alley seeing as my biggest passion outside of being a mother, is photography and digital artwork. In fact, several years ago I was lucky enough to collaborate on a piece for my husbands 5th album. For several weeks I used a combination of Photoshop and Paint shop pro along with digital photos that I took. The result was great judging by a lot of mentions of it during my husbands interviews. I’d share it with you but I have a strict policy not to talk about my husband’s band on my blog since he is fairly well known. You know, have to leave some air of mystery! (That’s why it’s rare you see a picture of him on my blog).
Since this is a Mommy blog I’ll also spare you the horror artwork, which is my absolute favorite thing to do and I’ll share something a little more motherly, along with a few quick tips to help you make the best of your photo projects. Let’s start out with the tips.
* Keep your digital photos organized – Set up individual folders for everything. My computer automatically sorts everything by date, which helps me find things a lot easier. On top of this I have folders labeled: Edited, Stock, Photos to mess around with, Finished artwork, Family and then one folder in each person’s name. Sometimes I have pictures in multiple folders but that’s ok because I always know where to find them! You can also set up folders to hold frames, backgrounds, fonts and anything else you may find on the web from time to time that will help you with your photo projects.
* Keep A Memory Box – I have something I call a memory box. It’s just a cute little box I found at a store for roughly 12.99. It’s zebra print and it has locking handles. It looks like a piece of luggage. I keep it in my living room on my bookshelf. Inside I keep all my printed photos, birthday and Christmas cards, birth announcements, baby stuff and various photos our extended family has sent us. I keep them all in this box because before I had it they were literally all over my house! They were in my office, my dresser, on the floor, in the closet. Everywhere. Every single time I would go looking for a specific photo I couldn’t find it! The goal was to keep them all in one place that’s out of the way yet easily accessible. This way when I want to scan them (or eventually sort them into albums) I have them right at hand and don’t spend hours searching. This box is also great for keeping things like scrapbooks or framing materials you may come across but don’t have time to use at the moment.
Now that I’ve made it perfectly clear you should keep your photos and everything to do with them organized, I’ll give you a few simple tips for using photo editing software that can make your photos look like a million bucks.
* Use the blemish tool – Almost every piece of software these days has something called a “blemish tool”. I can’t give you exact titles for Photoshop simply because I have yet to install it on my new computer. Either way almost all programs have it. Find it and make it your friend. It’s easy to use. You simply click the tool and when you click on a blemish it will take color from another spot on the picture (usually just a few mm away) and will fill in the blemish. Keep doing this until the blemish disappears. Now you may think this a waste of time BUT once you see your final result you’ll see why you learned how in the first place.
* Frames Make All The Difference – For this particular subject I am talking about digital frames. Framing a photo just makes it pop instead of leaving it flat and boring. I prefer to use a white or black border (or frame) of about 25 pixels on all of my finished photos or artwork.
* Black and White – Transforming your favorite color photo into black and white can sometimes change the whole dynamic of a photo. Add a simple white border as I discussed above, and frame it in glass. You’re done. No adjusting colors. No fixing red-eye. Simple and to the point.
Last but not least, here are a few examples of my own artwork & photography that I transformed using Photoshop and various other programs over the years. The first photo being an example of everything we talked about above.
 |
 |
 |
 |
 |
 |
1-2. Before & After – My baby suffered from baby acne for several weeks. I really wanted a nice photo of him. I used the makeover tool, black & white, soft focus and framing to transform the photo.
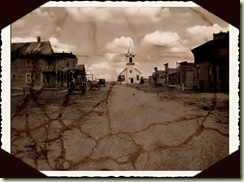
3. 1880 Town in South Dakota – Added cracked background for “old photo” effect. Sepia tone, framed.
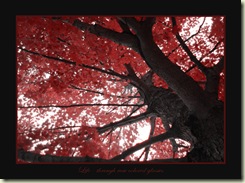
4. Life Through Rose Colored Glasses – Adjusted color tones, cropped and framed
5. Svinesund Bridge In Sweden – Black & white, Soft focus, Framed
6. Sunset At Stony Creek – Amazingly enough only added frames. Used Sunglasses as a filter to keep the sun from glaring in the camera lens. Taken with a 5mp camera!
So you see, it’s easy to take OR make beautiful photos! All it takes is a few tricks up your sleeve and a little practice.
Whatever you do, make sure you share your projects with your family or friends, whether online or in person will really get you motivated to do more projects. You’ll get great feedback, which is always encouraging and in the end you’ll make lasting memories for all involved.
Disclaimer: I wrote this blog post while participating in the TwitterMoms and Adobe blogging program, making me eligible to receive a $50 gift card. For more information on how you can participate, click here.”


